Search Our Database
How to install WordPress in CentOS
Introduction
This guide explains how to install WordPress on a CentOS server. It is intended for users who need to set up a WordPress website on a CentOS environment, ensuring that the correct steps are followed for a successful installation. The process covers the installation of necessary software like Apache, MySQL, and PHP (LAMP stack), along with the steps required to configure WordPress. These instructions apply to CentOS 8 systems and should be followed by users with root or sudo privileges.
Prerequisites
- A CentOS 8 server with root or sudo access.
- A registered domain name (optional but recommended).
- A fully updated CentOS server (use yum update).
- Apache, MySQL (MariaDB), and PHP installed (instructions provided below).
- Port 80 and 443 on target server is not blocked by cloud provider of local firewall
Step-by-Step Guide
Step 1: Install Apache Web Server
Start by installing the Apache web server, which will handle web requests to your WordPress site.
sudo yum install httpd
After the installation, start and enable the Apache service to run on system boot:
sudo systemctl start httpd
sudo systemctl enable httpd
Step 2: Install MySQL (MariaDB)
Next, install MariaDB, which is the database system that WordPress uses to store information.
sudo yum install mariadb-server mariadb
Start and enable the MariaDB service:
sudo systemctl start mariadb
sudo systemctl enable mariadb
Secure your MariaDB installation by running the following command:
sudo mysql_secure_installation
Follow the on-screen prompts to set up a root password and remove insecure defaults.
Step 3: Install PHP
PHP is required by WordPress for server-side processing. Install PHP along with its necessary modules:
sudo yum install php php-mysql
Restart Apache to ensure it works with PHP
sudo systemctl restart httpd
Step 4: Download and Configure WordPress
Navigate to your Apache document root directory and download the latest version of WordPress:
cd /var/www/html
sudo wget http://wordpress.org/latest.tar.gz
Extract the downloaded archive:
sudo tar -xzvf latest.tar.gz
Rename the WordPress directory and give it the correct ownership:
sudo mv wordpress/* /var/www/html/
sudo chown -R apache:apache /var/www/html/*
Step 5: Create a MySQL Database for WordPress
Log into MySQL and create a new database for WordPress:
mysql -u root -p <your database root password>
Within the MySQL prompt, execute the following commands to create a database and user:
CREATE DATABASE wordpress;
GRANT ALL PRIVILEGES ON wordpress.* TO 'username'@'localhost' IDENTIFIED BY 'password';
FLUSH PRIVILEGES;
EXIT;
Step 6: Configure WordPress
WordPress needs a wp-config.php file in order to run. WordPress by default provides a config sample file during default installation. We just need to rename it to wp-config.php
Rename the sample configuration file:
sudo mv wp-config-sample.php wp-config.php
From this point, you need to edit the wp-config.php so that it points to the previous database with correct credentials. You can achieve so by two methods:
Method 1: Configure via CLI
Edit the configuration file to update the database details:
sudo vi wp-config.php
Update the database name, user, and password fields to match the information from Step 5:
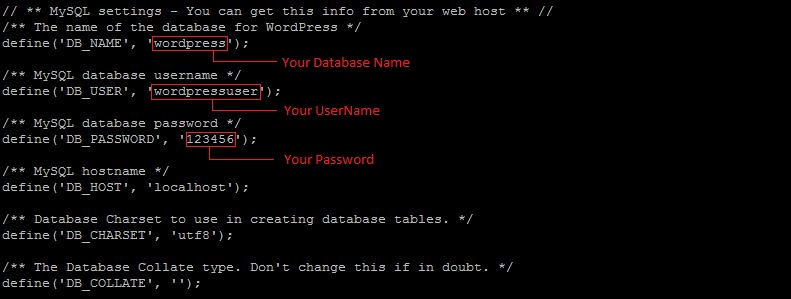
define('DB_NAME', 'wordpress');
define('DB_USER', 'username');
define('DB_PASSWORD', 'password');
Save the file and exit the editor.
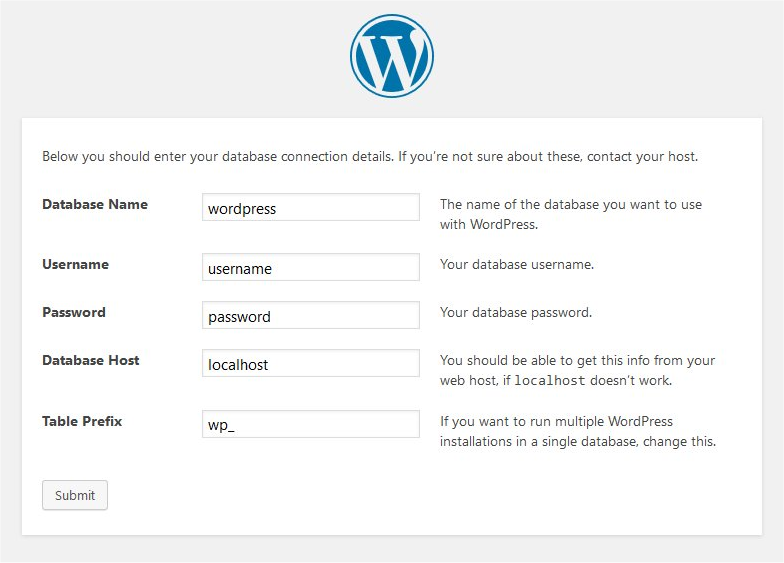
Method 2: Configure via WEB GUI
Open your web browser and navigate to http://your_domain_or_IP. You should see the WordPress config page. Follow the on-screen instructions to complete the configuration.
Step 7: Finalize Installation
Set the correct permissions for the WordPress files:
sudo chown -R apache:apache /var/www/html/*
sudo chmod -R 755 /var/www/html/*
Finally, restart Apache:
sudo systemctl restart httpd
Now, open your web browser and navigate to http://your_domain_or_IP. You should see the WordPress setup page. Follow the on-screen instructions to complete the installation.

Conclusion
By following this guide, you have successfully installed WordPress on a CentOS server. Ensure that you regularly update both WordPress and your server software to maintain security and performance. For additional assistance or if you encounter any issues, please contact our support team at support@ipserverone.com.
Article posted on 22 February 2020 by IPSERVERONE