Search Our Database
How to change file/folder permissions in cPanel
Introduction
This article is designed to guide you through the process of changing file permissions in cPanel. In the context of a web hosting environment, file permissions play a crucial role in determining who can read, write, and execute your account’s files and directories (folders). While default permissions are assigned when files are created, there are occasions, such as during updates or installations, when you might need to modify these permissions.
Prerequisite:
Before proceeding, ensure that you have access to your cPanel account. You should have the necessary login credentials to access the cPanel dashboard where the File Manager is located. It’s also important to have a basic understanding of file permissions and their implications for security.
Steps to Change File Permissions in cPanel:
1. Login to cPanel and Click on File Manager under Files section.
2. The Permissions for each file should be listed at the right-hand side of the screen once you are in File Manager.
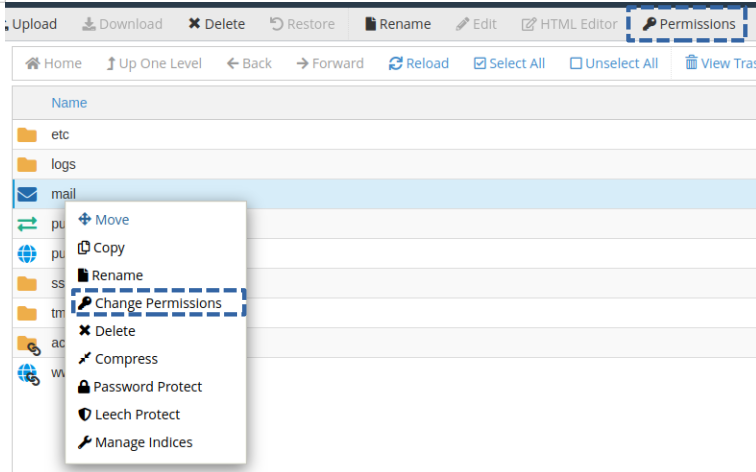
3. In the File Manager, choose the file for which the permissions need to be changed, then either click the Permissions at the top or right-click and choose Change Permissions.
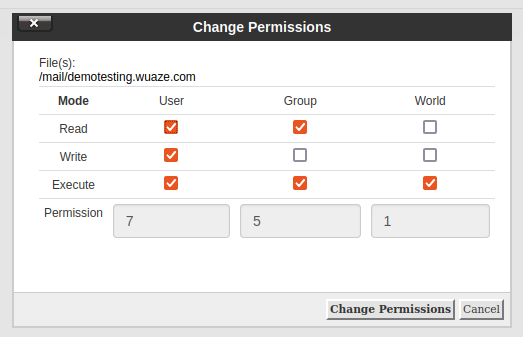
4. You can select the permissions you would like to set for the file by checking the box and click on ‘Change Permission’ once you are done.
That’s all! Remember to only change file permissions if necessary. You should avoid granting more access to your files than necessary, as this can leave your website prone to vulnerability.
Conclusion
Changing file permissions in cPanel is a straightforward process, but it’s one that should be carried out with caution. It’s crucial to only modify permissions when necessary and to avoid granting excessive access rights. Unnecessary permissions can expose your website to vulnerabilities. Always ensure that your permissions are as restrictive as possible while still allowing your website and its applications to function correctly.


