Search Our Database
How to change OpenSSH Port on CentOS 7
Introduction
This guide is for system administrators or users managing Linux servers who want to enhance security by changing the default OpenSSH port (port 22). Changing the port helps to reduce the risk of unauthorized access by making it harder for attackers to guess the port. This guide will take you through the steps to change the port in your SSH configuration and adjust the related security settings.
Prerequisites
- SSH access to the server with root privileges
- Basic knowledge of SSH configuration
Step 1: Back up the current SSH configuration
Before making any changes, it is important to back up the current SSH configuration. You may use the following command:
cp /etc/ssh/sshd_config /etc/ssh/sshd_config.bak
This command will create a backup file named sshd_config.bak.
Step 2: Open the SSH configuration file
To open the configuration of SSH file, navigate to the path below:
vi /etc/ssh/sshd_config
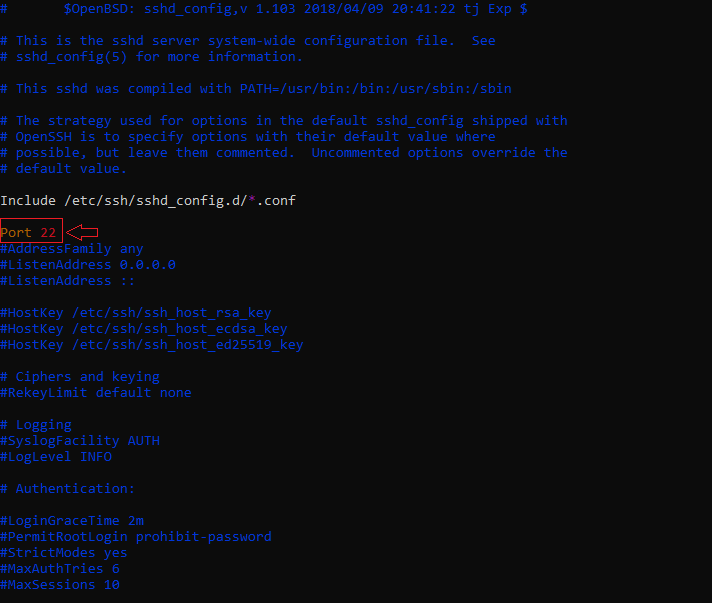
Step 3: Change the SSH port
Uncomment the line that starts with Port and change the value from 22 to another value that is not in use.
Step 4: Save and exit the file
Save your changes and exit the file editor vi by typing :wq
Step 5: Configure SELinux to allow the new SSH port
By default, SELinux only allows SSH through port 22. Thus, we need to configure its rules. First, install the following package:
yum -y install policycoreutils-python
Step 6: Set up SELinux to allow the new SSH port
Use the following command to configure SELinux rules to allow the port that you have chosen:
semanage port -a -t ssh_port_t -p tcp
Step 7: Configure the firewall to allow traffic on the new SSH port
Next, configure the firewall to allow traffic on the newly chosen SSH port:
firewall-cmd --permanent --zone=public --add-port=/tcp
Step 8: Reload the firewall configuration
After a “success” message appears, reload the firewall configuration using:
firewall-cmd --reload
Step 9: Restart the SSH service
Restart the SSH service by typing:
systemctl restart sshd.service
Step 10: Verify the new SSH port
Check if the new SSH port is active by running the following command:
ss -tnlp | grep ssh
Step 11: Test the new SSH port
Open a new SSH session and try logging in using the new port:
ssh -p user@your_server_ip
This step is crucial to ensure you can access the server using the new port.
Conclusion
By following these steps, you can successfully change the default OpenSSH port on your server. This small but effective security measure reduces the likelihood of unauthorized access by making it harder for attackers to guess the server’s SSH port.
Article posted on 18 April 2020.
