Search Our Database
How to create a Spam Email Filter in cPanel
Introduction
cPanel offers a feature called Spam Filters that allows users to control how incoming mail is handled. Adjusting spam filter settings can help reduce unwanted spam emails and improve inbox organization. If spam has become a problem, modifying these settings to be more aggressive in detecting spam is an effective first step toward managing unwanted messages.
This guide will walk through the process of creating and customizing spam filters to better suit individual needs and preferences.
Prerequisites
Before starting, make sure of the following:
- You have access to your cPanel account to log in and make changes to spam filter settings.
Steps to Create and Customize Spam Filters in cPanel
Step 1: Log in to cPanel
- Access your cPanel account by entering your login credentials.
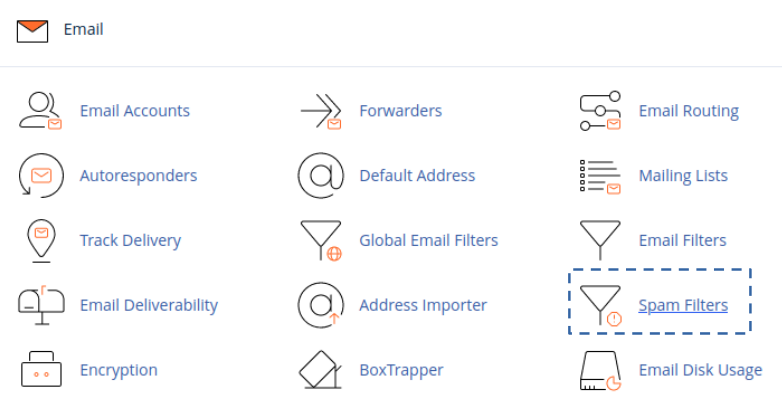
- In the Email section, select Spam Filters. You can also type “Spam Filters” in the cPanel search bar to quickly find the option.
Navigation Path: cPanel » Home » Email » Spam Filters
Step 2: Enable Apache SpamAssassin (if not already enabled)
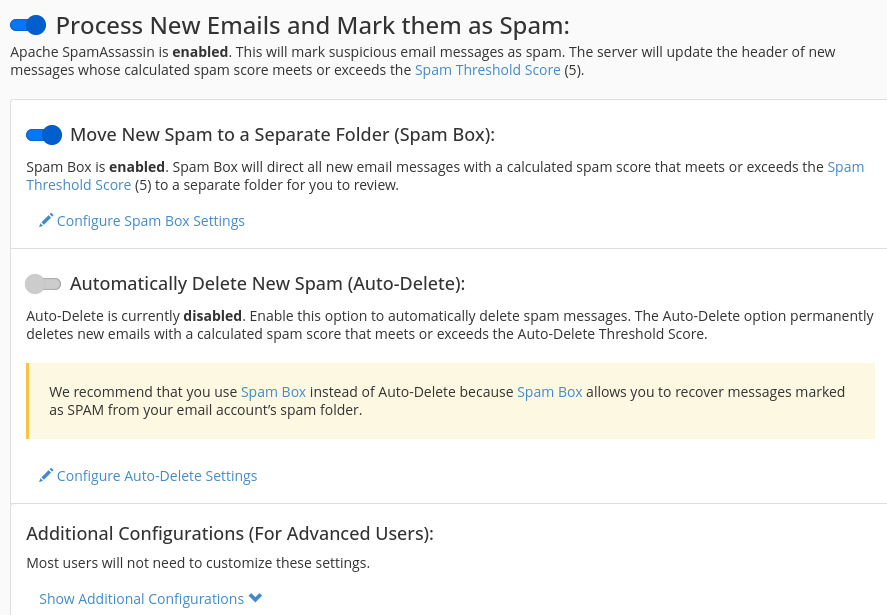
- On the Spam Filters page, check if Apache SpamAssassin is enabled. This tool is required for setting up and adjusting spam filtering.
- If Apache SpamAssassin is disabled, click the button to enable it.
- After enabling, proceed to adjust the Spam Threshold Score to control how aggressively spam is identified.
Step 3: Set the Spam Threshold Score
- In the Spam Threshold Score settings, select a value from the dropdown menu:
- Score of 10: Least aggressive, allowing more emails through.
- Score of 1: Most aggressive, filtering emails that might be closer to legitimate emails but may contain spam characteristics.
- After choosing the preferred score, click Update Scoring Options to save the setting.
- Once saved, click Return to Overview to return to the main Spam Filters page.
Step 4: Configure Additional Spam Filter Options
cPanel’s Spam Filters also provide options for further customization:
- Move New Spam to a Separate Folder (Spam Box): This option moves all identified spam to a specific folder, making it easier to review if needed.
- Automatically Delete New Spam (Auto-Delete): This option will permanently delete emails flagged as spam. Use this option cautiously to avoid losing legitimate emails.
- To whitelist or blacklist specific email addresses or domains, go to Additional Configurations (For Advanced Users). Here, you can:
- Add email addresses or domains to the whitelist to ensure they bypass spam filtering.
- Add email addresses or domains to the blacklist to ensure emails from these sources are always flagged as spam.
Conclusion
Customizing spam filters in cPanel enables users to better manage and control unwanted emails, resulting in a more organized inbox. For optimal results, regularly review spam filter settings, especially if auto-delete is enabled, to prevent legitimate emails from being inadvertently filtered. By making these adjustments, cPanel users can tailor incoming email handling to meet specific preferences and improve overall email management.
Should you have any inquiries about the guidelines, please feel free to open a ticket through your portal account or contact us at support@ipserverone.com. We’ll be happy to assist you further.
Article posted on 22 September 2023


