Search Our Database
How to Generate OpenSSL RSA Key Pair on Linux Cloud Server
Introduction
This guide is intended for Linux system administrators and users who need to generate an RSA key pair using OpenSSL for secure authentication or encryption purposes. RSA key pairs are commonly used in SSH key-based authentication, secure file transfers, and establishing encrypted connections. This article will demonstrate how to generate both the private and public RSA keys and how to securely manage them.
By the end of this article, you will be able to generate an RSA key pair using OpenSSL and use these keys for various security-related purposes in a Linux environment.
Prerequisite
- Login to your Linux instance via SSH using the default user. We will be using PuTTY as our SSH client for this tutorial.
Note
Notice that “centos” is shown here in this tutorial as the default login user and path because this instance is running on the CentOS image. The default user and path will differ based on the image of your choice.
Ubuntu Image – “ubuntu” default user
Debian Image – “debian” default user
CentOS Image – “centos” default user
Step-by-step guide
Step 1: Login to your Linux instance via PuTTY.

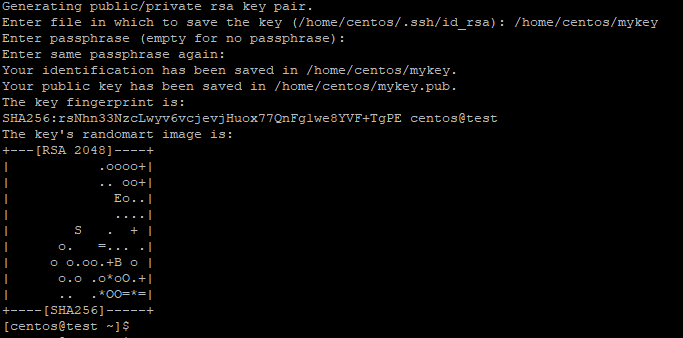
Step 2: In the terminal/command line, enter “ssh-keygen“. Take note that the private key generated with this command will be in the .pem format, you might need to convert the private key to other formats in order to be compatible with your SSH client.
Step 3: Specify the filename for your keypair (eg: /home/centos/mykey), or leave it empty to save your key to the default path.
Step 4: (Optional) Specify the passphrase for your key.
Step 5: Add your generated public key to the “authorized_keys” file to allow SSH to be authenticated using the generated key pair. Enter “cat /path/to/your/key.pub >> /home/centos/.ssh/authorized_keys” in the terminal/command line. Please substitute /path/to/your/key.pub with the actual path specified when you generated your key pair in Step 3.
Step 6: (Optional) Remove the default key pair. Edit the “authorized_keys” file with your preferred editor, we will be using the “vi” text editor. Enter “vi /home/centos/.ssh/authorized_keys” in the terminal/command line.
Step 7: (Optional) Delete the default public key entry in the “authorized_keys” file and save the changes.
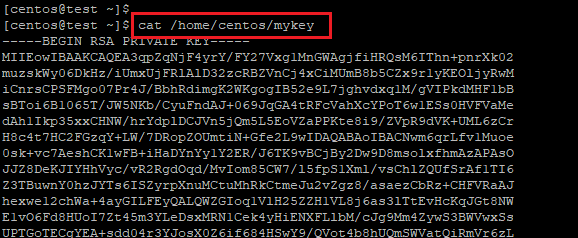
Step 8: Retrieve the generated private key and use them for your next SSH session. Enter “cat /path/to/your/key” in your terminal/command line and copy the private key content and save it with Notepad or TextEdit. You need to include the lines “—–BEGIN RSA PRIVATE KEY—–” and “—–END RSA PRIVATE KEY—–” when you copy.
Tips
You can also enable SSH password authentication and login as the root user by following this tutorial.
Conclusion
By following these steps, you have successfully generated an RSA key pair using OpenSSL on a Linux machine. These keys can now be used for secure authentication and encryption. It is critical to manage your private key securely to ensure your data and communications remain protected.
For additional assistance or if you encounter any issues, please contact our support team at support@ipserverone.com.
Article posted on 14 December 2020 by jzyap


