Search Our Database
How to install PHP selector and upgrade PHP version on DirectAdmin Custombuild 2.0 in Centos 7
Introduction
Upgrading PHP and selecting different PHP versions is a critical task for server administrators who manage websites with various PHP compatibility requirements. DirectAdmin, through Custombuild 2.0, provides a flexible way to install multiple PHP versions and select the appropriate PHP handler for each domain. The PHP Selector feature allows users to easily switch between versions, ensuring compatibility with both older and newer PHP-based applications.
This guide will cover the step-by-step process of installing the PHP Selector and upgrading PHP versions on a server running CentOS 7 and DirectAdmin Custombuild 2.0. Administrators can modify PHP configurations to meet specific requirements, enabling better control over performance, security, and compatibility. This guide is particularly useful for server administrators managing shared hosting environments or websites requiring multiple PHP versions.
Prerequisites
- A CentOS 7 server running DirectAdmin with Custombuild 2.0.
- SSH access to the server with root privileges.
- Basic knowledge of DirectAdmin and PHP handling options.
Step-by-step Guide
Step 1: Access the Server via SSH
First, access your server through SSH and log in as the root user. Use the command below, replacing your_server_ip with your server’s actual IP address.
ssh root@your_server_ip
Step 2: Edit the Custombuild Configuration File
Navigate to the options.conf file, which controls the PHP versions and handlers in DirectAdmin’s Custombuild configuration. Open the file using vim or your preferred text editor:
vim /usr/local/directadmin/custombuild/options.conf
Step 3: Modify PHP Version and Handlers
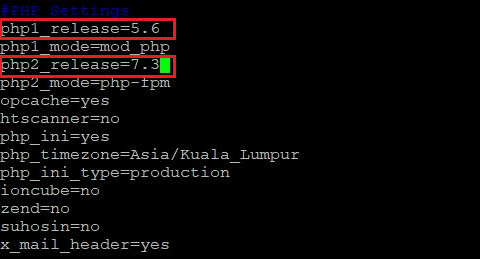
In the options.conf file, locate the PHP configuration section. You will find directives such as php_release and php_mode. Modify these values according to the PHP versions and handlers you wish to configure. Below is an example setup where PHP 5.6 is the default version using the mod_php handler, and PHP 7.3 is set with the php-fpm handler.
Step 4: Save and Exit the File
After making the necessary changes to the options.conf file, save and exit by typing the following command:
:wq
Step 5: Build the Selected PHP Versions
Navigate to the CustomBuild directory and run the following commands to apply the changes and build the selected PHP versions:
cd /usr/local/directadmin/custombuild
- Set the fastest download mirror for CustomBuild updates:
./build set_fastest
- Update CustomBuild to the latest version:
./build update
- Rebuild PHP with the newly specified versions:
./build php n
This will build and install the selected PHP versions according to the configuration set in options.conf.
Step 6: Select the PHP Version in DirectAdmin
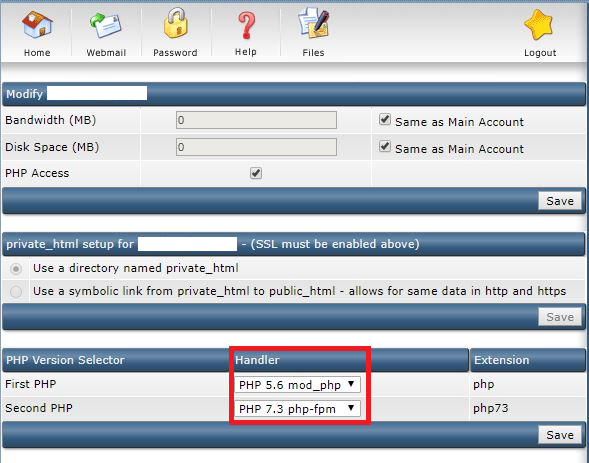
Once the PHP versions are built, you can select which version to use for each domain within DirectAdmin.
- Log in to DirectAdmin.
- Navigate to Domain Setup.
- Select your domain.
- Choose the desired PHP version from the available options.
This allows you to switch between different PHP versions depending on the specific needs of the domain.
Conclusion
This guide covers the process of installing the PHP Selector and upgrading PHP versions in DirectAdmin CustomBuild 2.0 on a CentOS 7 server. By editing the options.conf file and rebuilding PHP, administrators can configure multiple PHP versions and select them as needed for different domains. This flexibility ensures that websites requiring different PHP versions can coexist on the same server, ensuring compatibility and ease of management.
Should you have any inquiries about the guidelines, please feel free to open a ticket through your portal account or contact us at support@ipserverone.com. We’ll be happy to assist you further.

