Search Our Database
How to SSH into your Cloud server
Introduction
In this tutorial, we will guide you through the most important step for accessing your cloud server. Since your hosting plan is unmanaged, the only way to access your server is via SSH (Secure Shell). SSH provides a secure way to manage and interact with your server remotely.
Using Windows Platform
To connect to your server via SSH on a Windows platform, you’ll need to use an SSH client like PuTTY. Follow the steps below:
Step 1: Download and Install PuTTY
- Download PuTTY from here
- Install the program on your Windows computer.
Step 2: Run PuTTY
Once installed, launch the PuTTY application. You will see an interface similar to the one below:
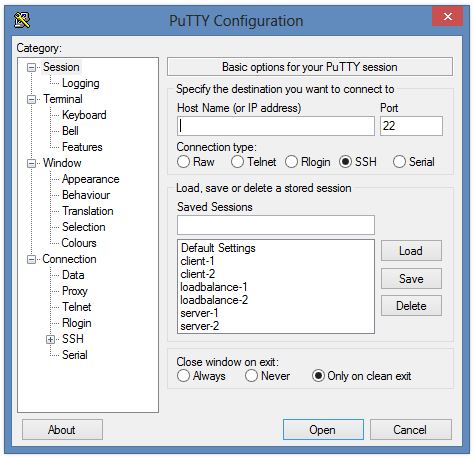
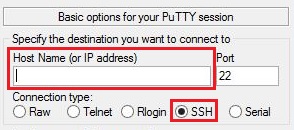
Step 3: Enter Your Server’s IP Address
- In the “Host Name (or IP address)” field, enter your server’s IP address.
- The default port number is “22” and the connection type should be set to SSH.
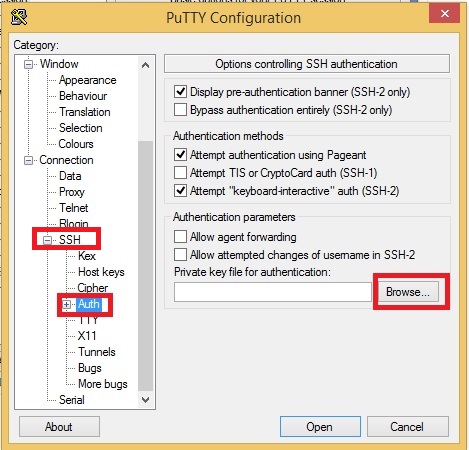
Step 4: Load Your Server Keypair
- On the left sidebar, expand the SSH option.
- Click on Auth (short for Authentication).
- Browse and select your server keypair file (e.g., server.ppk).
Step 5: Open the SSH Connection
- Click the Open button.
- A command prompt window will pop up, prompting you to log in with your server’s username and password.
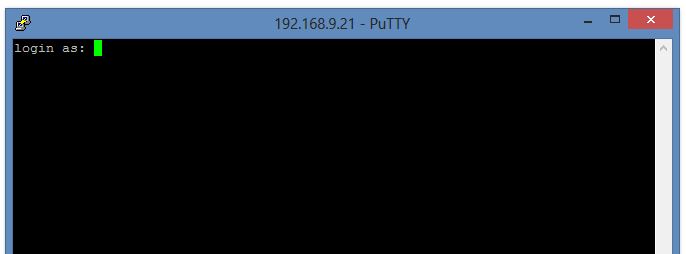
Step 6: Login to Your Server
- Enter your username and password when prompted.
- If the credentials are correct, you will successfully log in to your cloud server.
Using Linux/Mac Platform
For Linux or Mac platforms, you can use the built-in terminal to access your server via SSH. Follow these steps:
Step 1: Open Your Terminal
Run your terminal program and enter the following command to access your server:
![]()
ssh Ip-Address-Here -lLogin-UserName -pPort-Number
Replace the placeholders with your actual server details:
- IP-Address-Here: The IP address of your server.
- Login-UserName: The username used to access your server (e.g., root for CentOS). For Ubuntu equipped server, you will need a username and password. (e.g. -ljohnnytan , -ldavidyong)
- Port-Number: The SSH port number. Default is 22, If your SSH port number is different than the default port number, include the syntax -pPort-number. (e.g. -p9321, -p1234).
Step 2: Confirm Connection
- If it’s your first time connecting to the server, you’ll see a message like this:

Type yes to add the server to your known_hosts file.
- After confirming, you’ll be prompted to enter the server’s password. Once authenticated, you will successfully gain access to your cloud server.
Step 3: SSH Using a Private Key (Alternative Method)
To log in using a private key, adjust the command as follows:
ssh -i /path/to/private-key.pem IP-Address-Here -lLogin-UserName -pPort-Number
Example:
ssh -i /path-to-the-keyfile/downloaded-key.pem 192.168.9.21 -lubuntu -p9321
or
ssh -i /path-to-the-keyfile/downloaded-key.pem almalinux@192.168.9.21 -p22
🖊️ Note: The username you use will depend on the server’s operating system:
- centos: for CentOS OS
- rocky: for Rocky Linux OS
- almalinux: for AlmaLinux OS
- ubuntu: for Ubuntu OS
Regardless, always refer to the login details provided by the engineer for accuracy.
Step 4: Set Correct Permissions for the Private Key
SSH requires that private keys have restricted file permissions. Before using the key, run:
chmod 600 /path/to/private-key.pem
Example:
chmod 600 /home/james/server-key.pem
Step 5: Confirm Successful Key-Based Login
Once connected via key-based authentication, the server will not request a password but will grant access directly if the key matches the server’s authorized keys.
Conclusion
By following these steps, you can easily access your cloud server through SSH, whether you’re using a Windows, Linux, or Mac platform. SSH is the primary method for managing an unmanaged hosting plan, ensuring a secure and encrypted connection. For additional assistance or if you encounter any issues, please contact our support team at support@ipserverone.com.
Article posted on 23 April 2020 by Louis