Search Our Database
How to Setup Protection Against Brute Force Attacks (Fail2Ban) in Plesk
Introduction
IP address banning (Fail2Ban) is an automated way to protect your server from brute force attacks. Fail2Ban uses regular expressions to monitor log files for patterns corresponding to authentication failures and other errors that are considered suspicious.
If an IP address makes too many logins attempts within a time interval defined by the administrator, this IP address is banned for a certain period of time. Fail2Ban can also update firewall rules and send email notifications. When the ban period is over, the IP address is automatically unbanned.
Prerequisites
Before proceeding, ensure you have:
- A Linux-based server (e.g., Ubuntu, CentOS).
- Root or sudo privileges to install and configure Fail2Ban.
- SSH access to the server.
Setup Guide
To set up Plesk to automatically ban IP addresses and networks that generate malicious traffic:
1. Go to Tools & Settings > IP Address Banning (Fail2Ban) (in the Security group). The Fail2Ban component has to be installed on your server.

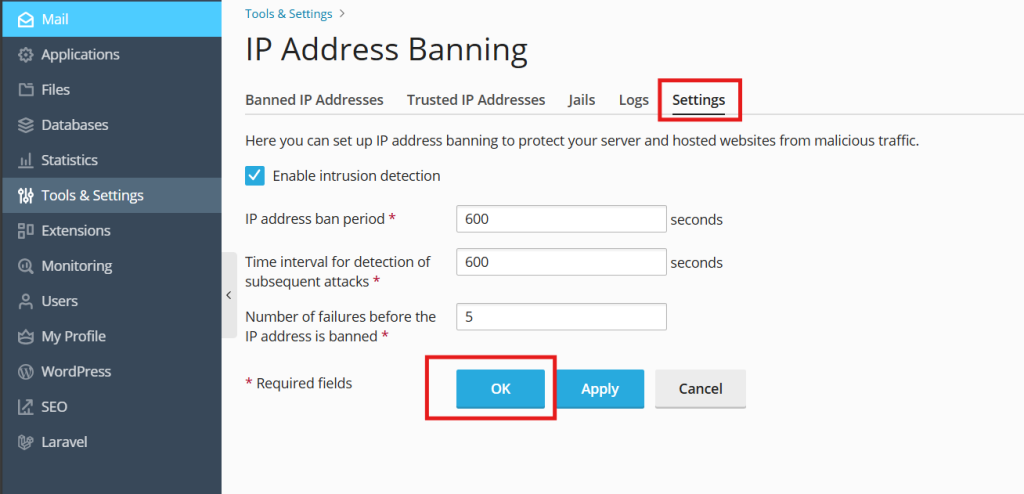
2. Go to the settings tab and select the Enable intrusion detection checkbox.
Specify the following settings:
-
- IP address ban period – the time interval in seconds for which an IP address is banned. When this period is over, the IP address is automatically unbanned.
- Time interval for detection of subsequent attacks – the time interval in seconds during which the system counts the number of unsuccessful login attempts and other unwanted actions from an IP address.
- Number of failures before the IP address is banned – the number of failed login attempts from the IP address.
3. After finalizing the settings, click “OK”. You will be prompted will an action successful notification

Now all active Fail2Ban jails will be used to monitor the log files and to ban suspicious IP addresses.
Troubleshooting Guide
Fail2Ban in Plesk has the following limitations and peculiarities:
- -Fail2Ban must not be restarted manually as a Plesk service, since all accumulated statistics data, including currently banned IP addresses, will be lost.
- Fail2Ban does not provide protection against attackers with an IPv6 address. Fail2ban in Plesk relies solely on IPs (without hostname lookups) unless reconfigured.
- Fail2Ban cannot protect from distributed brute force attacks, since it identifies intruders by their IP address.
If Plesk installed on a VPS
the VPS iptables records limit (numiptent) might affect the work of Fail2Ban. When this limit is exceeded, Fail2Ban will stop working properly and in the Fail2Ban log you will find a line such as
fail2ban.actions.action: ERROR iptables -I fail2ban-plesk-proftpd 1 -s 12.34.56.78 -j REJECT --reject-with icmp-port-unreachable returned 100
In this case, contact your VPS hosting provider to solve the issue.
If Fail2Ban is installed on your server before upgrading to Plesk 12,
the package will be replaced by Plesk’s Fail2Ban package. If your already installed package is newer than the one provided with Plesk, the upgrade might fail. Existing jails will not be overwritten, and you can manage them in Plesk together with Plesk 12 jails.
If an IP address should not be blocked:
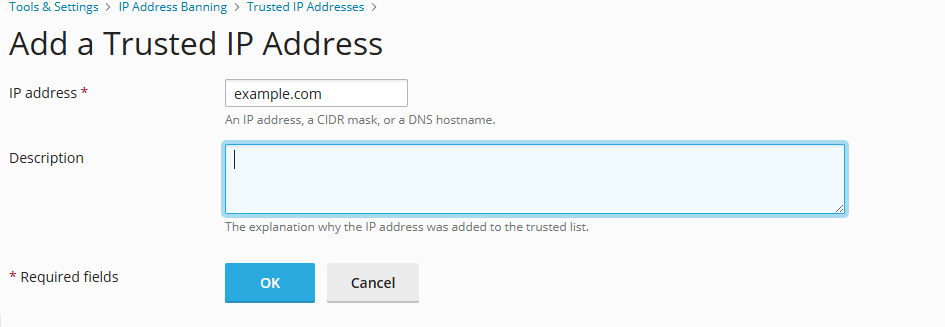
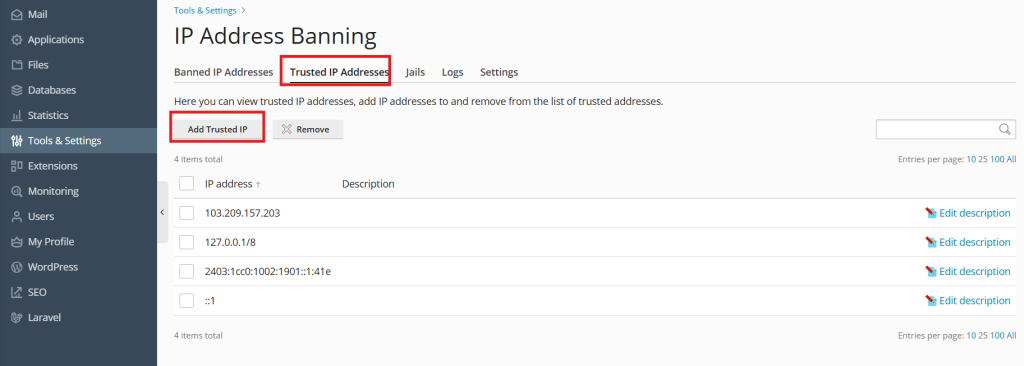
1. Go to Tools & Settings > IP Address Banning (Fail2Ban) > Trusted IP Addresses > Add Trusted IP.
2. In the IP address field, provide an IP address, an IP range, or a DNS host name, and click OK.

3. Verify the configuration by carry out the following steps:
- You can view and download Fail2Ban log files in Tools & Settings > IP Address Banning (Fail2Ban) > the Logs tab.
- You can view the list of banned IP addresses, unban them, or move them to the list of trusted addresses in Tools & Settings > IP Address Banning (Fail2Ban) > the Banned IP Addresses tab.
- You can view the list of IP addresses that will never be banned, add IP addresses to and remove from this list in Tools & Settings > IP Address Banning (Fail2Ban) > the Trusted IP Addresses tab.
Source: www.plesk.com
Conclusion
By installing and configuring Fail2Ban, you can effectively protect your Linux server from brute force attacks. The tool provides flexibility in setting custom rules for different services and ensures malicious IP addresses are blocked before they can cause harm. Always monitor Fail2Ban logs and adjust your security parameters as needed.
For additional assistance or if you encounter any issues, please contact our support team at support@ipserverone.com.
Article posted on 18 April 2020 by ips1


